Friday, September 30, 2011

Blog Sugar 2011

I had the wonderful opportunity to attend blog sugar this past weekend.
Thank you to the surfer guy for making this trip possible for me!


First we went to blackboard bistro on the PCH for lunch.
Then we took a quick group WIWW photo op. The car made a good tripod.
I had so much fun driving with Erika of Rouge & Whimsy from San Diego. She is a hoot!

Maggie and me (Yay!!!)
She is as sweet as she looks. A good, true friend.

Swag bags!
red letter art

baby boy bakery

lot's of awesome peeps!

We had men who would open our door, beautiful decor, and real true learning at the core. 


my notes and our agenda

and tasty treats were around every corner!


cotton candy... yes please!

My roomie Anna of Simple Mama's Shutter


Anna and Emily of Blue Corduroy

I listened to Maggie on Social Networking, Lindsey on the Juggling Act, and Jen Johnson on photography - Wonderful tips and help; I was writing notes as fast as I could!

Meg Duerkson was the keynote speaker. She made me laugh, she made me cry, she made me realize a lot that night. Thank you for sharing Meg! You are incredible!
Ruthanne of  Ruthanne Photography taking a photo of me taking a photo of Anna and Meg :)

We were taken care of and pampered. Thank you to Rachel, Andrea, and Jen for creating such a treat!
Taste and see that the lord is good. Psalms 34:8

Anna, Myself, and Ruthanne (my new bff - she is amazing. Amazing!)
Until next year :)

xoxo,
Sweet Shot Day

Sponsor Love {Songs Kate Sang}


1. Tell us a little bit about yourself and how you got started in the biz of handmade.
Once upon a time, my husband was transferred to Arizona (three years this past June). I had lived in Texas my entire life and missed my family and friends terribly. I love staying in touch with people, so I wrote letters. My sweet Denton, Texas friend, Aimee, encouraged me to make my own cards. Pretty soon, I had run out of people to write, but I had a stash of what I thought were super cute cards.


I got brave and started a blog and opened an etsy store for the cards. Since then, my etsy shop has transformed into a place to sell vintage golden books (one of my favorite collectibles) and prints from photographs I've taken.

2. Where do you draw inspiration from?
Someone once told me to be sure I never drew inspiration from my own genre. If you are a musician, don't draw from other musicians. If you are a photographer, don't draw from other photographers. This will make you more likely to come up with an original idea without copying.


I draw my inspiration from Nature. The beautiful Creation of my God. When I walk away from the technology and go on walks, I am met with the simple details of beauty.

3. Can you describe your blog and/or shop in 6 words or less?
The Songs of my life... my Psalms.

4. What does a typical workday look like? -this includes family/life ;)
I am out the door by 7am and home by 5:15pm, working in corporate America. Our nights are filled with homework, dinner, laundry, backpack unpacking, backpack repacking, showers, wet towels on the floor and singing songs at bedtime. After the kids are in bed, I pull out my computer and edit photos and schedule photo sessions for clients.

5. If you could travel to anywhere in the world, where would it be and why?
Right now, I would head to Houston, Texas. My grandmother is very sick and I would just want to sit with her. She is the most amazing woman. I am just ready to hug her at Thanksgiving! So ready.

6. What is your favorite dessert?
Oh goodness. A wonderful iced chai tea latte and a big slice of chocolate cake. Anything chocolate would really be fine with me. You know, hershey kisses. A handful of m&ms. perfection.
.....


I recently got to meet Kate in person (finally) at Blog Sugar this weekend. She is a doll! Her beauty and kindness constantly emanated from her all night! Thank you Kate for your presence in our lives :)

Please visit her blog & shop :)

xoxo,

Thursday, September 29, 2011

Sponsor Love {Sew Beastly Kitchen Towel Revamp}

Hello there lovely Lollipops readers!  I'm Citlalli from Sew Beastly, and I am delighted to be here at Krystina's lovely blog.  I couldn't be more excited to share this little tutorial with you today.  This diy is an easy and inexpensive way to revamp those boring kitchen towels and give them a personal touch.
The technique I am going to show you today is one that I thought of after being introduced to freezer paper.  Freezer paper can be found at any grocery store, next to the aluminum foil, and it resembles parchment paper.
I was first introduced to freezer paper when I read it was great for pattern making since it has a glossy side that is coated with a very thin coat of plastic.  This thin coating allows for you to iron on the freezer paper onto any fabric...the best part: it peels off without any fuss!!
The idea of making stencils out of this paper seemed like perfection since you are able to iron on the freezer paper and then peel it off without any problems.  I originally used this technique to paint different patterns on canvas, and I was surprised at how amazingly good this seemed to work.  I have been meaning to revamp my kitchen towels, and after much indecision this is what I came up with......
Well, I am a bit of the skull and crossbones fan, and I probably own too much skull and crossbones merchandise...{more than I am ready to admit}  But I had to do this...the towels seem to compliment my apron, and besides...Halloween and Dia De Los Muertos are right around the corner!!!
And now, without further ado.....my tutorial.  Enjoy!!
How to revamp your kitchen towels
Here are the materials you will need:
*Materials*
  • Paintbrushes- You don't necessarily need a particular kind, but I do recommend one that is strong enough to endure the pressure from blotting paint on surfaces.  I prefer synthetic bristles.
  • Kitchen towels- These can be old ones, new ones.... your choice.
  • Freezer paper- Found at the grocery store next to the aluminum foil.  Make sure it is the plastic coated one.
  • Exacto knife- This will be used to cut out your stencil, so be sure to have a sharp blade.
  • Opaque fabric paint- Please note that fabric paint and fabric dye are totally different.  I recommend opaque fabric paint because it is thicker in consistency, which means the paint won't be too watery and become a spot of paint instead of a painted design.  I am using Jaquard brand paint since I haven't heard a bad thing about the brand, and it has worked great for me in the past.  My design uses only black, but feel free to experiment with different colors.  I would recommend getting the primary colors+black and white.  That's as basic as you can get.
*Step One*
Choose your design and print it out on the freezer paper.  The freezer paper might be too thin for your printer to grab, so I came up with this solution:
Attach the freezer paper to some cardstock so the paper feeds easier through the printer.  Make sure the glossy side is facing the cardstock {this will prevent you from printing your design on the glossy side}.
Now remember that this is where you make this item your own.  Pick out an awesome design you want and print it out on the freezer paper.  Even better...hand-draw your design on the freezer paper, and make it even more special.
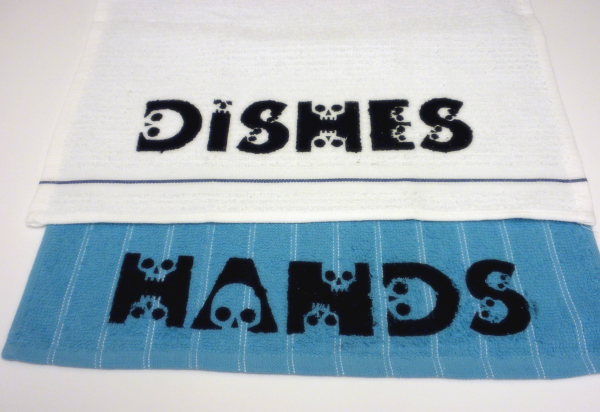
I picked out the words Hands and Dishes so I can have my towels labeled for use.  Yes, I am a bit OCD when using towels for different duties.
The font I used is called Skullphabet, and can be found at Dafont.com.  I went ahead and printed two different words, and the reason for the printing layout is to have my freezer paper act as a guide when I get ready to iron it on my towels.
*Step Two*
Grab your exacto knife, and cut away!!  This is the process of the tutorial where your patience might be tested.
The font I used is a bit intricate, and it might be too much for some people, but just use a font with straight lines and you will be able to use a ruler for the whole cutting process.
*Step Three*
Align your design with your towel, and iron it on.
Make sure you are ironing your design with the glossy side facing your towel.  You will end up with a mess to clean if the glossy part touches your iron, and that will be no fun!!
*Step Four*
Now it's time to get your paintbrush, and paint.  I find blotting the paint on is much more effective when working with a fabric like terry cloth.  
Let the paint dry off.
*Step Five*
Now it is time to carefully peel off the freezer paper and admire your design.
Hoorah!!  We did it!!  Keep admiring the awesomeness you just accomplished....here's my final product
Oh!  And remember the second word I printed out?
Well, there you have it ladies.  That is my way of personalizing my towels.  Mine are very simple, and might not be very colorful, but I didn't want to take the attention away from the font. 
This is quite easy to do, but even easier to make it your own.  And that is why this is such an great technique for personalizing anything that is made out of fabric. 
So start brainstorming and get to experimenting with how you can put your mark on anything made out of fabric....it can become a bit addictive!!
I hope you enjoyed this tutorial, and really wish this has inspired you to give it a try.  Thank you guys for reading along, and let me know how you made it your own...I would love to see all the great ideas out there.
Thank you for having me over Krystina!

Wednesday, September 28, 2011

What I Love Wednesday {No.35}

This weekend I attended Blog Sugar.
I learned about Love 146.
I am forever changed knowing these horrifying stories and shocking statistics.
Love 146 helps.
What I Love Wednesday is Love 146.
Please watch the video and visit their website and consider helping anyway you can.
I can't even imagine how truly, deeply awful something like this would be.
Here is Rachel Reeves' take. It's so moving. Thank you Rachel for sharing.


Meg Duerksen of Whatever spoke at blog sugar and 
said we need to use our blog voices for doing good.
I couldn't agree more Meg. Thank you!

Thank you friends for opening yourself up this morning.
I can't wait to see what you are loving today!

xoxo,
lollipops

Tuesday, September 27, 2011

Shop for Sharlie

I can't even imagine.
This woman is amazing through it all.
I would be a mess and pretty bitter.
She shows us love through the most difficult times.
But she needs a miracle.
We can help. Isn't that great?
First please pray for Sharlie.
Then please visit her blog or her give forward fundraiser page.

You can shop for goodies with the proceeds going to Sharlie here.
Also I will be donating 20% of all sales from my shop for the next 2 weeks.
Out of all these choices I am confident you will find some way you can give.

thank you.

Sponsor Love {Flawed Perfection Jewelry}

Meet Megan

1. Tell us a little bit about yourself and how you got started in the biz of handmade.
I'm a born & raised San Diegan who can't imagine living anywhere else. I'm currently attending business school with an emphasis in Entrepreneurship. I've always had a love for jewelry, even when I was little. Ever since I received a bead kit when I was 10, I've been whipping up creations for myself. When I was 16, I began really focusing on making gemstone jewelry. When I was 18, I officially started Flawed Perfection Jewelry and really started making things for sale.

2. Where do you draw inspiration from?
I draw inspiration from a lot of sources. Most of all, I'm inspired by the beautiful county I live in! The Pacific Ocean's greens, blues, and neutrals are my favorite. In addition, I'm inspired by color combos and what I see in fashion.

3. Can you describe your blog and/or shop in 6 words or less?
Fun, sophisticated, colorful, feminine, Completely ME!

4. What does a typical workday look like? -this includes family/life ;)
Since I'm a college student, my schedule is a little wacky! Most days:
Wake up & answer e-mails
Class
Answer e-mails, tweet, & work on the shop
Class
Catch up online, take pictures, & do homework
Watch t.v. while making & packaging orders
Hit the hay early since I can't ever have caffeine (7-8 a night!)

5. If you could travel to anywhere in the world, where would it be and why?
I would definitely visit the English Countryside! I have a raging obsession with everything Pride & Prejudice. The scenery from the 2005 version makes my heart swell, it's so beautiful! One day, I WILL get there!

6. What is your favorite dessert?
Hmmm...I have to go with a good, moist chocolate chip cookie.


visit her shop flawed perfection jewelry

Monday, September 26, 2011

Sponsor Love {Little Blue Feather Banner Tutorial}

Hi There!  I'm Michelle from Little Blue Feather sharing with you a simple tutorial on how to make a fabric banner.  There are several ways to make a fabric bunting banner, and today I am going to show you step by step my favorite and most simple banner. Photobucket Supplies needed: cutting mat rotary cutter (or scissors) fabric of your choice cotton twine (roping, string or yarn of your choice) light starch (optional) cardboard to cut triangle pattern (cereal boxes are perfect!) push pins thread pencil iron + ironing board sewing machine zipper foot for machine Step 1)  Create a triangle pattern out of cardboard (cereal boxes work great).  My triangle is 7 in tall by 6 1/2 wide.  You can make yours whatever size you want.
Photobucket
Step 2)  Choose the type of fabric you want to use.  You can do all the flags in the same fabric or choose a few prints and colors that you like together.  Head to your ironing board and lightly spray the fabric with starch then iron out all wrinkles.  Starch is not needed, but makes the fabric easier to work with.
Photobucket
Step 3)  Once fabric is pressed, you are ready to trace your triangle pattern on to the back side of the fabric using a pencil or a disappearing fabric marker.  *Keep in mind the print on the fabric.  You do not want to have the design upside down or not centered correctly.
Photobucket
Step 4)  Cut out all the triangle pieces using your rotary cutter and mat, or scissors.  Once all the pieces are cut, arrange them in the order you want to hang them.
Photobucket
Step 5)  Head back to the ironing board and fold 1/2 in down of the top of every triangle and steam press.  Cut the excess corners off the flags.
Photobucket
Step 6)  Place the cotton twine underneath the folded edges on the backside of fabric.  Pin in place.
Photobucket
Step 7) Thread machine and attach the zipper foot.  Make sure the settings are correct on your machine and you are ready to sew!
Photobucket
Step 8)  Sew each flag close to the twine, but do not stitch over the twine.  *The zipper foot will help with this.
Photobucket
Step 9)  This sewing method is my favorite for the banners because it allows you to move the banners along the twine.  Slide the flags however close or far apart you want them to be!
Photobucket
Step 10)  Take pictures of your awesome new banner!
Photobucket
Thank you for reading my tutorial!  Happy sewing!