Showing posts with label tutorials. Show all posts

Tuesday, August 14, 2012

hunger games party on a shoestring

the DVD release for the hunger games movie is this saturday!
have a DVD release party! decorate, watch the movie, do these fun activities, and eat the food from the hunger games!


invitation:
attendance is mandatory!
made in district 7 (trees, lumber = paper)
use the font from the movie; bank gothic.
click here for this free printable invitation i made for you :)
the actual printable is a bit larger and clearer
print onto colored paper :)
  • print out or purchase movie/book posters to hang
  • copy the mockingjay from the cover and cut it out and
  • hang up mockingjays around the party
  • have toy parachutes attached to your party favors
have everyone dress up:
  • like tributes
  • like the oddly bright citizens from the capitol
  • like Effie! haha
  • like Katniss, Peeta, Gale...
crafts & games:
  • make iron-on tee shirts with the mockingjay or the words: "may the odds be ever in your favor"
  • make bookmarks from cut pages
  • to really save money you can print out the mockingjay and trace it onto a white tee shirt (or other things) with a sharpie. 
    • for my daughter's thick shirt i had to hang it on a window for light to see what i was tracing since i don't have a light box :)
    • pin a target on a wall or better yet, have a stuffed animal set up to shoot toy arrows at
    • play manhunt
    and here is an SVG file you can download here
    for your cricut cutting machine using Sure Cuts A Lot
    then the possibilities are endless!!!
    get Sure Cuts A Lot here

    play: music from district 12 for the party

    eat:
    cookies


    more great dishes from fictional food
    take turns reading your favorite section from the book aloud.
    and if it's not too hot, serve hot chocolate!


    have fun!
    xoxo
    krystina

    Thursday, July 26, 2012

    Lemonade Ice Cubes DIY

    sweeten that lemon in your water.
    replace your lemon slice with a lemonade ice cube!
    and stay cool and hydrate more this summer!
    no more watered down iced tea, soda, or cocktails!

    i would call these my lovely assistants, however, they did most of the work ;)
    recipe:
    • for 1 cup of fresh squeezed lemon juice 
    • use 1 cup water 
    • and 1 cup sugar
    • freeze in ice cube trays
    add to:
    • water
    • your diet coke ;)
    • iced tea
    • citrus cocktails
    cheers!

    xoxo,
    krystina

    linking up with:

    Thursday, June 14, 2012

    Postagram for Father's Day!

    i love postagram!
    postagram is like instagram in the mail!
    and right now you can get 5 free credits, so
    i decided to order postcards for all the fathers!
    Daddy, my Dad, my Dad-in-law, and my Grandfather :)

    here's how easy it is:
    chose a photo from your iPhone or Android.
    type a message.
     preview.

    and mail
     this is what it looks like. 
    (we included the funny things B says to make it more personal)
    it arrived in 3 days!

    the photo pops out for keeping.
    i like the thickness of the postcard and photo.
    postagram, you won me over :)
    postagram is usually only .99 cents each (this includes postage!)


    are you ready for Father's Day?
    what are you making/doing for the Dads in your life?
    xoxo,

    Saturday, February 11, 2012

    Valentine Tic Tac Toe!

    last minute Valentine's fun!!!
    play a game of tic tac toe!
    the winner gets to eat the gumdrops! yay!!

    grab your favorite bag of gumdrops

    and these printables


    print on white paper or card stock
     wrap your gumdrops in a cello bag and add the printable with double stick tape 
    perfect for the party and for school mates :)

    xoxo,


    linked up to  Tatertots & Jello

    Thursday, January 19, 2012

    How to use Cozi Online Calendar for Meal Planning

    my new years resolution for 2012 is to simplify.
    in every sense of the word.
    i am focused on getting rid of clutter.
    streamlining tasks is another way of removing clutter and simplifying.
    i recently found Cozi, an online family calendar.

    • you can coordinate and share the calendar with all the members of the household.
    • get email reminders sent to specified family members.
    • use the iPhone app for Cozi on the go.

    however, my favorite Cozi feature is their menu planner!

    once you sign up for Cozi all you have to do is add the "add meals" button to your browser toolbar.
    then when you are on pinterest, martha stewart, simply recipes; etc all you have to do is click the "add meals" button and that recipe will be added to your "recipe box" on Cozi.

    simply drag meals to your calendar to plan the week or month.

    as you can see above the blue ones are links to recipes and the black ones i typed in - i can type in "pizza" - no need for a recipe, but this way i can still plan my week :)


    click "add ingredients to Cozi shopping list" and the ingredients for the recipe are now added on your Cozi shopping list! (which btw can be accessed from your iPhone at the grocery store because it's always automatically synchronized!!!)
    i open the recipe before dinner to look through the directions and either print it out or email it to my iPhone to bring to the kitchen for cooking :)

    you can write notes on each recipe in your recipe box to classify it as a family favorite or add tags to make it easy to organize and look up quickly. i added about 30 yummy recipes to Cozi in about 20 minutes of surfing recipes online.

    see? simplify. more time for the things in life that are important to me.
    what do you think?
    what do you currently use?
    xoxo,

    Thursday, September 29, 2011

    Sponsor Love {Sew Beastly Kitchen Towel Revamp}

    Hello there lovely Lollipops readers!  I'm Citlalli from Sew Beastly, and I am delighted to be here at Krystina's lovely blog.  I couldn't be more excited to share this little tutorial with you today.  This diy is an easy and inexpensive way to revamp those boring kitchen towels and give them a personal touch.
    The technique I am going to show you today is one that I thought of after being introduced to freezer paper.  Freezer paper can be found at any grocery store, next to the aluminum foil, and it resembles parchment paper.
    I was first introduced to freezer paper when I read it was great for pattern making since it has a glossy side that is coated with a very thin coat of plastic.  This thin coating allows for you to iron on the freezer paper onto any fabric...the best part: it peels off without any fuss!!
    The idea of making stencils out of this paper seemed like perfection since you are able to iron on the freezer paper and then peel it off without any problems.  I originally used this technique to paint different patterns on canvas, and I was surprised at how amazingly good this seemed to work.  I have been meaning to revamp my kitchen towels, and after much indecision this is what I came up with......
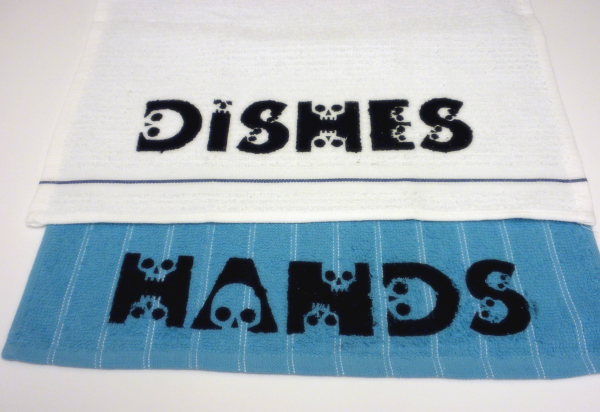
    Well, I am a bit of the skull and crossbones fan, and I probably own too much skull and crossbones merchandise...{more than I am ready to admit}  But I had to do this...the towels seem to compliment my apron, and besides...Halloween and Dia De Los Muertos are right around the corner!!!
    And now, without further ado.....my tutorial.  Enjoy!!
    How to revamp your kitchen towels
    Here are the materials you will need:
    *Materials*
    • Paintbrushes- You don't necessarily need a particular kind, but I do recommend one that is strong enough to endure the pressure from blotting paint on surfaces.  I prefer synthetic bristles.
    • Kitchen towels- These can be old ones, new ones.... your choice.
    • Freezer paper- Found at the grocery store next to the aluminum foil.  Make sure it is the plastic coated one.
    • Exacto knife- This will be used to cut out your stencil, so be sure to have a sharp blade.
    • Opaque fabric paint- Please note that fabric paint and fabric dye are totally different.  I recommend opaque fabric paint because it is thicker in consistency, which means the paint won't be too watery and become a spot of paint instead of a painted design.  I am using Jaquard brand paint since I haven't heard a bad thing about the brand, and it has worked great for me in the past.  My design uses only black, but feel free to experiment with different colors.  I would recommend getting the primary colors+black and white.  That's as basic as you can get.
    *Step One*
    Choose your design and print it out on the freezer paper.  The freezer paper might be too thin for your printer to grab, so I came up with this solution:
    Attach the freezer paper to some cardstock so the paper feeds easier through the printer.  Make sure the glossy side is facing the cardstock {this will prevent you from printing your design on the glossy side}.
    Now remember that this is where you make this item your own.  Pick out an awesome design you want and print it out on the freezer paper.  Even better...hand-draw your design on the freezer paper, and make it even more special.
    I picked out the words Hands and Dishes so I can have my towels labeled for use.  Yes, I am a bit OCD when using towels for different duties.
    The font I used is called Skullphabet, and can be found at Dafont.com.  I went ahead and printed two different words, and the reason for the printing layout is to have my freezer paper act as a guide when I get ready to iron it on my towels.
    *Step Two*
    Grab your exacto knife, and cut away!!  This is the process of the tutorial where your patience might be tested.
    The font I used is a bit intricate, and it might be too much for some people, but just use a font with straight lines and you will be able to use a ruler for the whole cutting process.
    *Step Three*
    Align your design with your towel, and iron it on.
    Make sure you are ironing your design with the glossy side facing your towel.  You will end up with a mess to clean if the glossy part touches your iron, and that will be no fun!!
    *Step Four*
    Now it's time to get your paintbrush, and paint.  I find blotting the paint on is much more effective when working with a fabric like terry cloth.  
    Let the paint dry off.
    *Step Five*
    Now it is time to carefully peel off the freezer paper and admire your design.
    Hoorah!!  We did it!!  Keep admiring the awesomeness you just accomplished....here's my final product
    Oh!  And remember the second word I printed out?
    Well, there you have it ladies.  That is my way of personalizing my towels.  Mine are very simple, and might not be very colorful, but I didn't want to take the attention away from the font. 
    This is quite easy to do, but even easier to make it your own.  And that is why this is such an great technique for personalizing anything that is made out of fabric. 
    So start brainstorming and get to experimenting with how you can put your mark on anything made out of fabric....it can become a bit addictive!!
    I hope you enjoyed this tutorial, and really wish this has inspired you to give it a try.  Thank you guys for reading along, and let me know how you made it your own...I would love to see all the great ideas out there.
    Thank you for having me over Krystina!

    Monday, September 26, 2011

    Sponsor Love {Little Blue Feather Banner Tutorial}

    Hi There!  I'm Michelle from Little Blue Feather sharing with you a simple tutorial on how to make a fabric banner.  There are several ways to make a fabric bunting banner, and today I am going to show you step by step my favorite and most simple banner. Photobucket Supplies needed: cutting mat rotary cutter (or scissors) fabric of your choice cotton twine (roping, string or yarn of your choice) light starch (optional) cardboard to cut triangle pattern (cereal boxes are perfect!) push pins thread pencil iron + ironing board sewing machine zipper foot for machine Step 1)  Create a triangle pattern out of cardboard (cereal boxes work great).  My triangle is 7 in tall by 6 1/2 wide.  You can make yours whatever size you want.
    Photobucket
    Step 2)  Choose the type of fabric you want to use.  You can do all the flags in the same fabric or choose a few prints and colors that you like together.  Head to your ironing board and lightly spray the fabric with starch then iron out all wrinkles.  Starch is not needed, but makes the fabric easier to work with.
    Photobucket
    Step 3)  Once fabric is pressed, you are ready to trace your triangle pattern on to the back side of the fabric using a pencil or a disappearing fabric marker.  *Keep in mind the print on the fabric.  You do not want to have the design upside down or not centered correctly.
    Photobucket
    Step 4)  Cut out all the triangle pieces using your rotary cutter and mat, or scissors.  Once all the pieces are cut, arrange them in the order you want to hang them.
    Photobucket
    Step 5)  Head back to the ironing board and fold 1/2 in down of the top of every triangle and steam press.  Cut the excess corners off the flags.
    Photobucket
    Step 6)  Place the cotton twine underneath the folded edges on the backside of fabric.  Pin in place.
    Photobucket
    Step 7) Thread machine and attach the zipper foot.  Make sure the settings are correct on your machine and you are ready to sew!
    Photobucket
    Step 8)  Sew each flag close to the twine, but do not stitch over the twine.  *The zipper foot will help with this.
    Photobucket
    Step 9)  This sewing method is my favorite for the banners because it allows you to move the banners along the twine.  Slide the flags however close or far apart you want them to be!
    Photobucket
    Step 10)  Take pictures of your awesome new banner!
    Photobucket
    Thank you for reading my tutorial!  Happy sewing!