


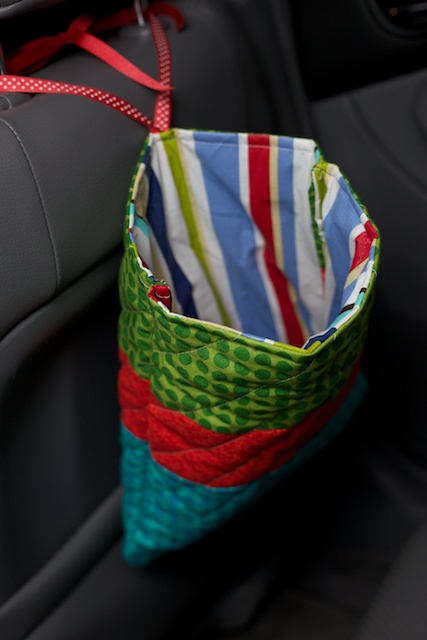
Hi Friends, Francis of Bibeez Baby here and I would love to show you how to make "The Cutest Backseat Bag That You Have Ever Seen".
I really think you'll like it :-)
I call this a backseat bag, because we mostly use it in the back seat as a Garbage Bag! It can also be used to keep small toys, snacks, books and games at hand on road trips or around town. Or maybe a storage solution in the playroom- hang several bags on pegs. I am also making one to put on the side of my sewing table as a thread catcher. There are so many uses! Note that I recycled a vinyl table cloth in the version I show you here. It's great because I can wipe it clean if the need arises; but it's up to you and what you are making it for. Start to finish it took me about 1 hour, and that included a mishap with my sewing machine and my finger (ouch)! So I'd say no longer than 45 minutes total! Easy-peasy!
Materials Needed:

- 35" of 1/2'' wide ribbon (I used a cute polka dot grosgrain)
- 2 pieces of batting or interfacing 12" x 15" (I like the "fluffy" look of batting)
- 2 pieces of lining fabric 12" x 15" ( I used remnants of a vinyl table cloth so I can easily wipe it clean. You could also laminate your fabric if you'd like)
- 2 pieces of fabric for the outer of the bag
- I made mine patchwork. The sizes of the fabric are as follows:
- 2 pieces 7'' x 12'' ( teal in my bag )
- 2 pieces 5" x 12'' ( green)
- 2 pieces 3.5'' x 12'' (red)
- Coordinating thread
- Scissors
- Sewing Machine (and a heavier needle if you decide to use the vinyl, swap in the heavy needle when you sew everything together.)
Method:
I began by piecing my patch work together using a 1/4'' seam allowance. This gave me two panels 12" x 15". (Don't forget to iron the seams flat when you're done.)

Next I quilted the outer fabric to the batting. This is an optional step- I did quick diagonal lines ranging 1"-2" apart.

The next step is to fold your ribbon in half and pin the folded part to the top of the outer fabric. Now pin the lining fabric and outer fabric right sides together. The ribbon should be sandwiched in between the two pieces of fabric.


Straight stitch around the 4 edges with 1/4" seam, and leave a 3-4 inch opening for turning. Now turn right side out.

Repeat with the remaining outer fabric, batting/interfacing, and lining (except without ribbon this time). Turn right side out.
O.k. we are almost finished now! Top stitch over the opening that you used for turning, and if you desire- topstitch along the very top of each panel.


Now, pin the panels right side (outer fabric) together, and sew on all 3 sides without ribbon.

Turn right side out and....Tah-dah! You have yourself the sweetest backseat bag.

So what do you think? What will you use yours for?
This bag is available in my Etsy shop if you aren't feeling crafty and would like to snatch it up. And if you all like it then maybe I'll add some more!
Oh, by the way- since I am so excited about sharing my first tutorial with you on Lollipops I want to offer all of you lovely folks a fantastic discount. Just enter LOLLIPOPS at checkout to receive a 15% discount!!! The code will only be available until June 3rd --- Hope to be hearing from you soon! Have a great rest of the week!
Best Wishes,
Frances
- 2 pieces of batting or interfacing 12" x 15" (I like the "fluffy" look of batting)
- 2 pieces of lining fabric 12" x 15" ( I used remnants of a vinyl table cloth so I can easily wipe it clean. You could also laminate your fabric if you'd like)
- 2 pieces of fabric for the outer of the bag
- I made mine patchwork. The sizes of the fabric are as follows:
- 2 pieces 7'' x 12'' ( teal in my bag )
- 2 pieces 5" x 12'' ( green)
- 2 pieces 3.5'' x 12'' (red)
- Coordinating thread
- Scissors
- Sewing Machine (and a heavier needle if you decide to use the vinyl, swap in the heavy needle when you sew everything together.)
Method:
I began by piecing my patch work together using a 1/4'' seam allowance. This gave me two panels 12" x 15". (Don't forget to iron the seams flat when you're done.)

Next I quilted the outer fabric to the batting. This is an optional step- I did quick diagonal lines ranging 1"-2" apart.

The next step is to fold your ribbon in half and pin the folded part to the top of the outer fabric. Now pin the lining fabric and outer fabric right sides together. The ribbon should be sandwiched in between the two pieces of fabric.


Straight stitch around the 4 edges with 1/4" seam, and leave a 3-4 inch opening for turning. Now turn right side out.

Repeat with the remaining outer fabric, batting/interfacing, and lining (except without ribbon this time). Turn right side out.
O.k. we are almost finished now! Top stitch over the opening that you used for turning, and if you desire- topstitch along the very top of each panel.


Now, pin the panels right side (outer fabric) together, and sew on all 3 sides without ribbon.

Turn right side out and....Tah-dah! You have yourself the sweetest backseat bag.


So what do you think? What will you use yours for?
This bag is available in my Etsy shop if you aren't feeling crafty and would like to snatch it up. And if you all like it then maybe I'll add some more!
Oh, by the way- since I am so excited about sharing my first tutorial with you on Lollipops I want to offer all of you lovely folks a fantastic discount. Just enter LOLLIPOPS at checkout to receive a 15% discount!!! The code will only be available until June 3rd --- Hope to be hearing from you soon! Have a great rest of the week!
Best Wishes,
Frances
She has the cutest shop =)
ReplyDeleteGah! You make me blush :-)
ReplyDelete